Monday, April 23, 2012

Weight Watchers 0 Point
Cabbage Soup


I was looking for a low carb recipe and stumbled upon this WW 0 Pt Cabbage Soup.  I believe it's the ultimate guilt free soup.  I've already had two bowls of this already.  My only regret is not cooking more because this will go fast with the family.  This soup is extremely easy to make and you can be flexible with what you want to put in it.  Next time I'm going to add more tomato paste and crushed red peppers.  I like it quite spicy. :-)

Weight Watchers 0 Point
Cabbage Soup

Ingredients
  • 3 cups nonfat beef broth (beef is the best) or 3 cups nonfat vegetable broth (beef is the best) or 3 cups nonfat chicken broth (beef is the best)
  • 2 garlic cloves , minced
  • 1 tablespoon tomato paste
  • 2 cups chopped cabbage
  • 1/2 yellow onion
  • 1/2 cup chopped carrot
  • 1/2 cup green beans
  • 1/2 cup chopped zucchini
  • 1/2 teaspoon basil
  • 1/2 teaspoon oregano
  • salt & pepper 

Directions
  1. Spray pot with non stick cooking spray saute onions carrots and garlic for 5 minutes.
  2. Add broth, Tomato paste, cabbage, green beans, basil, oregano and Salt & Pepper to taste.
  3. Simmer for a about 5-10 minutes until all vegetables are tender then add the zuccini and simmer for another 5 or so minutes.
Bookmark and Share

Saturday, April 21, 2012

French Baguettes

Fresh out of the oven.

Before going in the oven.

Oui oui.  Délicieux.  Arome.  Amour.  Ladies and Gents, these French Baguettes are excellent, especially straight out of the oven.  My love for breads is growing and I just love learning to cook different kinds.  I'm still intimidated with making sourdough, but soon, soon.  Nonetheless, enjoy!  The batch I made above are one and a half of the recipe below.

French Baguettes
makes 2 baguettes
from allrecipes.com

Ingredients

  • 1 cup water
  • 2 1/2 cups bread flour or all purpose flour
  • 1 tablespoon white sugar
  • 1 teaspoon salt
  • 1 1/2 teaspoons bread machine yeast
  • 1egg yolk
  • 1 tablespoon water

Directions

  1. Place 1 cup water, bread flour, sugar, salt and yeast into bread machine pan in the order recommended by manufacturer. Select Dough cycle, and press Start. (Tip: You don't need a bread machine - I used my Kitchen-aid - otherwise get dirty and use your hands, it's fun)
  2. When the cycle has completed, place dough in a greased bowl, turning to coat all sides. Cover, and let rise in a warm place for about 30 minutes, or until doubled in bulk. Dough is ready if indentation remains when touched.
  3. Punch down dough. On a lightly floured surface, roll into a 16x12 inch rectangle. Cut dough in half, creating two 8x12 inch rectangles. Roll up each half of dough tightly, beginning at 12 inch side, pounding out any air bubbles as you go. Roll gently back and forth to taper end. Place 3 inches apart on a greased cookie sheet. Make deep diagonal slashes across loaves every 2 inches, or make one lengthwise slash on each loaf. Cover, and let rise in a warm place for 30 to 40 minutes, or until doubled in bulk.
  4. Preheat oven to 375 degrees F (190 degrees C). Mix egg yolk with 1 tablespoon water; brush over tops of loaves.
  5. Bake for 20 to 25 minutes in the preheated oven, or until golden brown. 
Bookmark and Share

Sunday, April 8, 2012

Rolls, Bread, and Veggies


These Soft Yeast Rolls were loved by the whole family.  There was no hesitation to reach for a second and third serving.  They're THAT good.  They go well with butter, cheese, and of recent I've had them with Nutella.  Absolute YUM!!!
Soft Yeast Rolls
By The Virtuous Wife
Ingredients
2 cups of lukewarm water (105 degrees) 
3 Tbs dry yeast
1/3 cup powdered (dry) milk
5 cups flour (separated)
1/2 cup cooking oil
1 Tbs salt
1/2 cup sugar

Step 01
In a bowl, combine the water, yeast, dry milk, and 2 cups of flour. Let sit for 5-8 minutes. This is called preparing "the sponge" for the dough.

Step 02
After the "sponge" has risen and puffed up, add to stand mixer. Add the oil, salt, and sugar.

Step 03
Begin mixing in the remaining 3 cups of flour, one cup at a time. It will be an elastic, sticky dough.

Step 04
Grease a bowl with cooking oil (1/4 cup of a cup, usually) and put the sticky, unkneaded dough in the bowl. Cover with saran wrap and let rise until double in size (about an hour).

Step 05
Once it's risen, punch down, and turn it out on a floured surface. Knead the dough once or twice, just to get it shaped into a ball. Divide the dough in half to make it more manageable. 

Step 06
Roll the dough into a log shape and begin pinching palm-full sized rolls off the log. Shape them into circles and lay them in a greased baking dishes (I used a 9X13 and an 8X8 dish). The sides of each roll should just touch the others.

Step 07
Cover the dishes with saran wrap and let rise in a warm place for 20-25 minutes. Until double in size.

Step 08
Bake at 400 degrees for 15-20 minutes until tops of rolls are golden brown. Butter the tops of the hot rolls when they come out of the oven. Let cool for 5-10 minutes and enjoy!       

The rolls before going in the oven.

Also made Baked Veggies.  Simple and extremely easy.   Choose any veggies you like: asparagus, tomatoes,
onions, zucchini, assortment of colored peppers, and carrots.  Cut and mix in a bowl with olive oil and garlic salt.   Place in baking sheet.  Bake at 400° F until potatoes are soft.  Broil for 4-5 minutes.  Add salt as desired.

My mom's secret banana bread recipe.  The recipe usually call for crushed walnuts but I was too lazy to
go to the grocery store.  Nonetheless, the banana bread is moist and delicious.  Secret recipe indeed.
 
Bookmark and Share

Thursday, April 5, 2012

Let's Go Out To The Kitchen


When I was 8 years old, new to the Americas, I saw this commercial on television and got hooked singing the song "Let's go out to the kitchen..."  I remember being thin and getting criticized for it.  Adults kept telling me to eat because I looked anorexic.  As a young impressionable kid who sought love and approval, I made myself eat even though I didn't want to.  Then I gained the weight and was still criticized for being chunky - by then the damage was done - I couldn't get out of the kitchen.  ha ha!  So I stayed to this day.  :-D

In essence, I love the kitchen and all the cool stuff that can be created there.  It's not only a form of art, but a party for my taste buds.  One of the most satisfying things in the world is to taste a variety of impeccable foods.  Even to travel and dare to risk eating street vendor foods with optimistic caution is exciting.  Hopefully one of these days I'll be able to travel to do so - then blog about it.

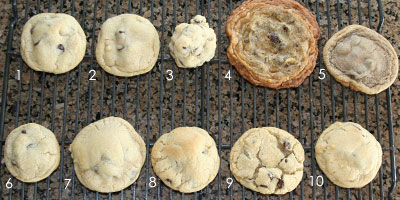
Saw this helpful little snippet on pinterest about finding your mistakes into baking the perfect chocolate chip cookie from the website itself.  It's very useful and good for someone who loves to bake cookies such as myself:

PROBLEMS
From the Perfect Chocolate Chip Cookie
 There are many variables in baking.  Pictured are cookies with various problems using the same dough (with flour adjustments in numbers 3 &4).

  1. This cookie is done just right. It is pictured to compare with the rest.
  2. This dough was not refrigerated.  It is still good but a little flatter than it should be.
  3. This dough contained too much flour and did not spread much at all. It is interesting to note that the dough looked identical to the correct dough, but was much stiffer and drier.
  4. This dough had too little flour.  It spread too much and didn’t bake evenly.
  5. This dough was over-mixed.  It had a poor color, baked flat and had a strange consistency. 
  6. This dough was formed too small.  It was overcooked at eight minutes. It is fine to make smaller cookies, just bake them for less time.
  7. This dough was formed too large.  The outsides were done while the middle was too high and underdone.
  8. This dough was baked in an oven 25 degrees too hot.  The outside was overdone and the inside was slightly underdone.
  9. This dough was baked in an oven 25 degrees too cool.  It fell flat and became too crisp without much of an inside.
  10. This dough was frozen when baked.  It took longer to bake and didn't cook as evenly.  To use frozen dough, set on cookie sheet at room temperature while oven is preheating, 15-20 minutes.  It takes the frost off and bakes perfectly.

Check out the website, it's pretty awesome - and don't forget to follow me on pinterest.
Bookmark and Share

Saturday, March 24, 2012

The Look of Spring 2012

At VV Park.
Looks like heaven on earth.
Magnolias in Bloom


Like I said in my other blog,  I made a BIG (rookie) photography blunder.  I learned something new with my Nikon so I decided to test it out and many of my photos turned out blurred.  Total failure.  It taught me a lesson though, never experiment with photography during important events (my mother in law is visiting from Ukraine).

Anyway, some photos were salvageable so here they are.  It's nice to take photos again.  I thoroughly enjoyed it.  It was so relaxing.

Downtown Bank Entrance

Another view of downtown

Trees budding

Allergy season looks so beautiful

Down by the Riverside

We went to the Putnam Museum where they have dozens of life size animatronic dinosaurs in their exhibit.
It was too cool.  There were a few occasions that caused me to jump.  It was scary yet exciting.


Bookmark and Share

Friday, March 16, 2012

From Mess To Success


When we moved in our house (newly weds) I didn't really cook much so we only had the staple spices:  salt, pepper, garlic salt, and oregano.  Then all of the sudden I was cooking like a mad chef and buying different spices left and right - spices I've never even heard of.  Then we had a baby and everything got shoved here and there.  Suffice it to say that it became a mess that it finally pissed me off.  From a mess to success - the small spices are arranged alphabetically, and the bigger spices are arranged by how often they're used.  The 3-Tier Spice Racks are inexpensive.  One costs less than $3.00 at Wal-Mart - prices may vary.

One small step for me, one giant leap to being a new mommy.  There's still a lot of cupboards to organize, so let the Spring cleaning begin!
Bookmark and Share

Saturday, March 3, 2012

Candies From Heaven


Russian candies are where it's at!!!  We got a call from our friends, Angie and Jenica, a few days ago asking if we wanted something from a Russian store in Colorado.  Um... ABSOLUTELY!!!  And might I add, we stocked up big time with these treats.  I hope it will last for a while... right?  lol.  We're now thankful to have someone to supply us with goodies.

The above are Chocolate Covered Plum and Chocolate Covered Apricot Russian candies.  The plums are my favorite.  What's awesome about Russian candies are that they're not too sweet - gotta love them.  There are other types of Russian candies out there but these are what Dre wanted.  Hopefully next time we'll order an assortment of goodies.

Family Updates:
Well, we had a baby boy - the most adorable baby boy EVER!!!  He keeps life interesting and busy.  Visit our baby blog and check it out:  http://ellababybump.blogspot.com.
Bookmark and Share